Customizing the header
- 1. Read the header first
- 2. Add your first button
- 3. Icons and tooltips
- 4. The three
runtypes - 5.
${variables}andwhen - 6. Ordering, and how the two files combine
- 7. Chips — putting information in the header
- 8. Filtering the Skill menu
- See also
When the only way to run something is to type it into the terminal, you type it dozens of times a day. MulmoTerminal lets you put your own buttons on the header of a running session: a few lines of config, and sending /compact, running the tests, or opening the team wiki all become one click.
This page starts from adding your very first button. The full field reference lives in Configuration → customizing the header.
1. Read the header first
Here is a cell with nothing configured. The header has two rows.

| Where | What’s there | What config changes |
|---|---|---|
| Row 1, left | the status dot and info chips like ⎇ main | chips reorders, hides and adds |
| Row 1, right | expand / set aside / close — cell actions | not configurable (app structure) |
| Row 2, left | ~/acme-api ▾ — the path menu (below) | not configurable |
| Row 2, right | the Skill dropdown and a row of icon buttons | buttons lands here |
The right-hand side of row 2 is what you customize. Of the small icons to the right of ⚡ Skill above, the leftmost paperclip is the only default button (Insert a file path); the rest are fixed app controls.
There are only two default buttons — Insert a file path, and Open this branch’s PR (which appears only when the branch has an open PR). Reveal in the file manager, Browse files in the app, New terminal here and the GitHub links used to be here and have moved into the path menu below.
The path menu — anything to do with the directory
The path on the left of row 2 (~/acme-api ▾) is a button. It opens the actions that apply to this cell’s directory.

When the repository’s remote resolves to GitHub, Repository / Issues / Pull requests appear below a divider. This menu is fixed and config does not change it — if you want one of these as a button too, write it yourself in buttons and you get both.
2. Add your first button
Which file to write in
| File | Applies to |
|---|---|
~/.mulmoterminal/config.json | every terminal |
<project>/.mulmoterminal.json | only cells opened in that directory |
Starting per-project is the safer experiment. Create .mulmoterminal.json in the project root:
{
  "buttons": [
    {
      "id": "compact",
      "icon": "compress",
      "label": "Compact this conversation",
      "run": "input",
      "text": "/compact"
    }
  ]
}
No server restart is needed. The header is re-read when the working directory, session or agent changes, and when the browser window regains focus — so save in your editor, switch to the browser, and it’s there.
What pressing it does
run: "input" types /compact into the Claude / Codex running in that cell and submits it — the same thing you’d do by switching to the terminal and typing, in one click.
The trap — writing buttons replaces the defaults
Writing buttons anywhere replaces the whole built-in set (it is not merged on top). Write only the example above and Insert a file path disappears. List it yourself if you want to keep it:
{
  "buttons": [
    { "id": "pick-file", "icon": "attach_file", "label": "Insert a file path", "run": "open", "open": { "pickFile": true } },
    { "id": "compact", "icon": "compress", "label": "Compact this conversation", "run": "input", "text": "/compact" }
  ]
}
3. Icons and tooltips
This is what trips people up first.
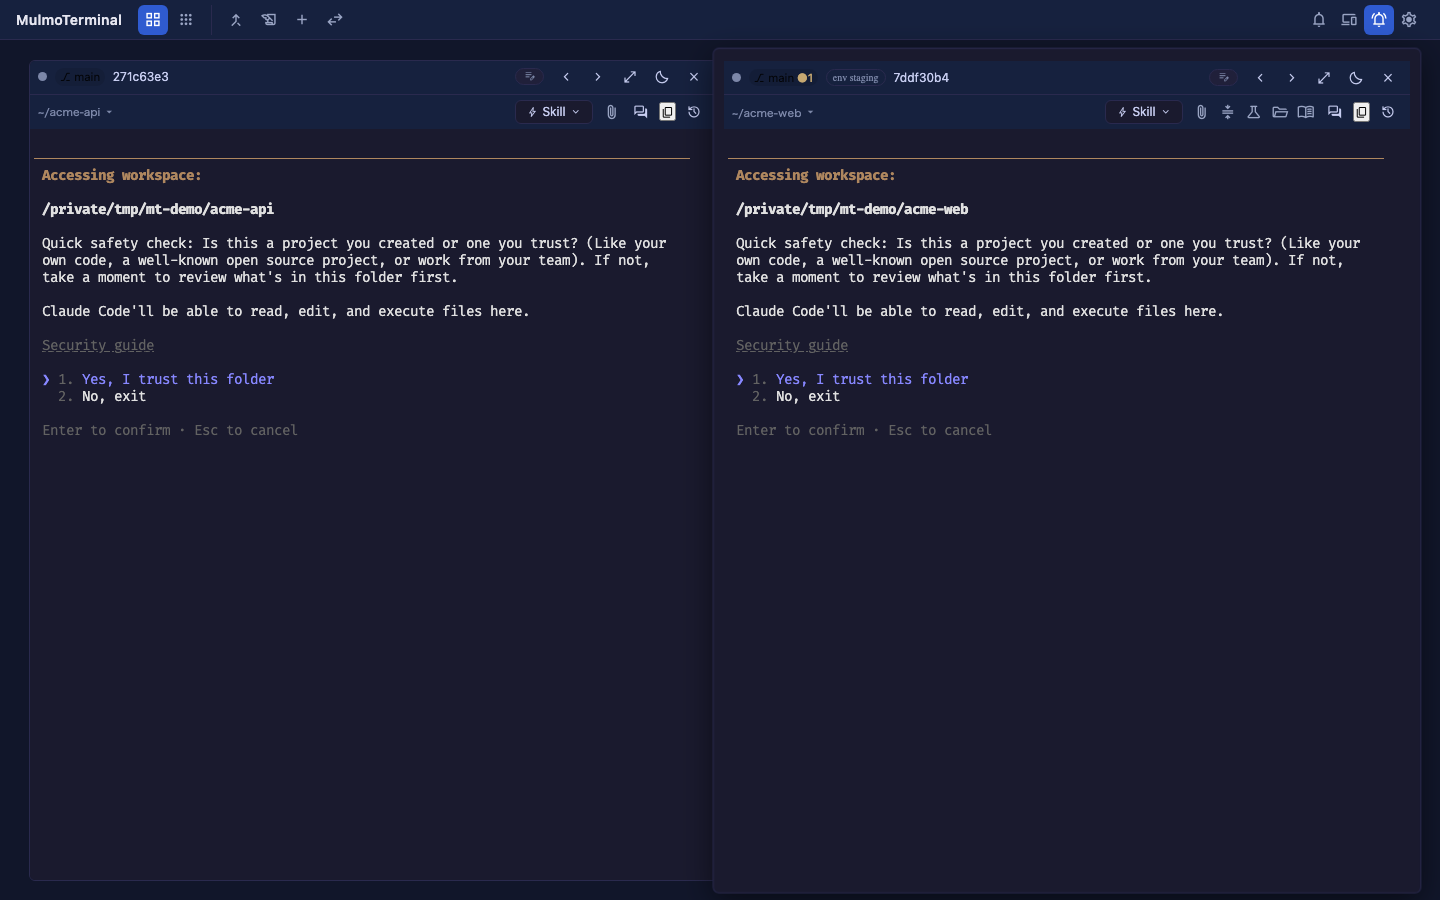
label is not drawn on screen. A button renders only its icon, and label becomes the tooltip you get on hover (the browser’s own).
So label is your only way to say what a button is. Prefer a phrase that names the action — Run the tests, not Build — because nobody reads it until they hover.
| Key | Role |
|---|---|
icon | a Material Symbols name (compress, science, menu_book, …). The only thing drawn |
emoji | a single emoji; wins over icon |
label | required. The hover tooltip, and the accessible name (aria-label) |
With neither icon nor emoji, you get bolt (a lightning bolt). A row of identical bolts tells you nothing, so always set icon.
Below is a header with five buttons configured. Note that not one of them shows any text.

Side by side with an unconfigured cell — unconfigured on the left, the config above on the right:
4. The three run types
run decides what a button does. There are only three.
run: "input" — send it to the agent
Types text into the session and submits it. For slash commands and prompts you repeat.
{ "id": "compact", "icon": "compress", "label": "Compact this conversation", "run": "input", "text": "/compact" }
run: "shell" — run a command
Runs cmd in a command cell, leaving the agent’s session undisturbed.
{ "id": "test", "icon": "science", "label": "Run the tests", "run": "shell", "cmd": "yarn test" }
Pressing it opens a cell like this and shows the output:
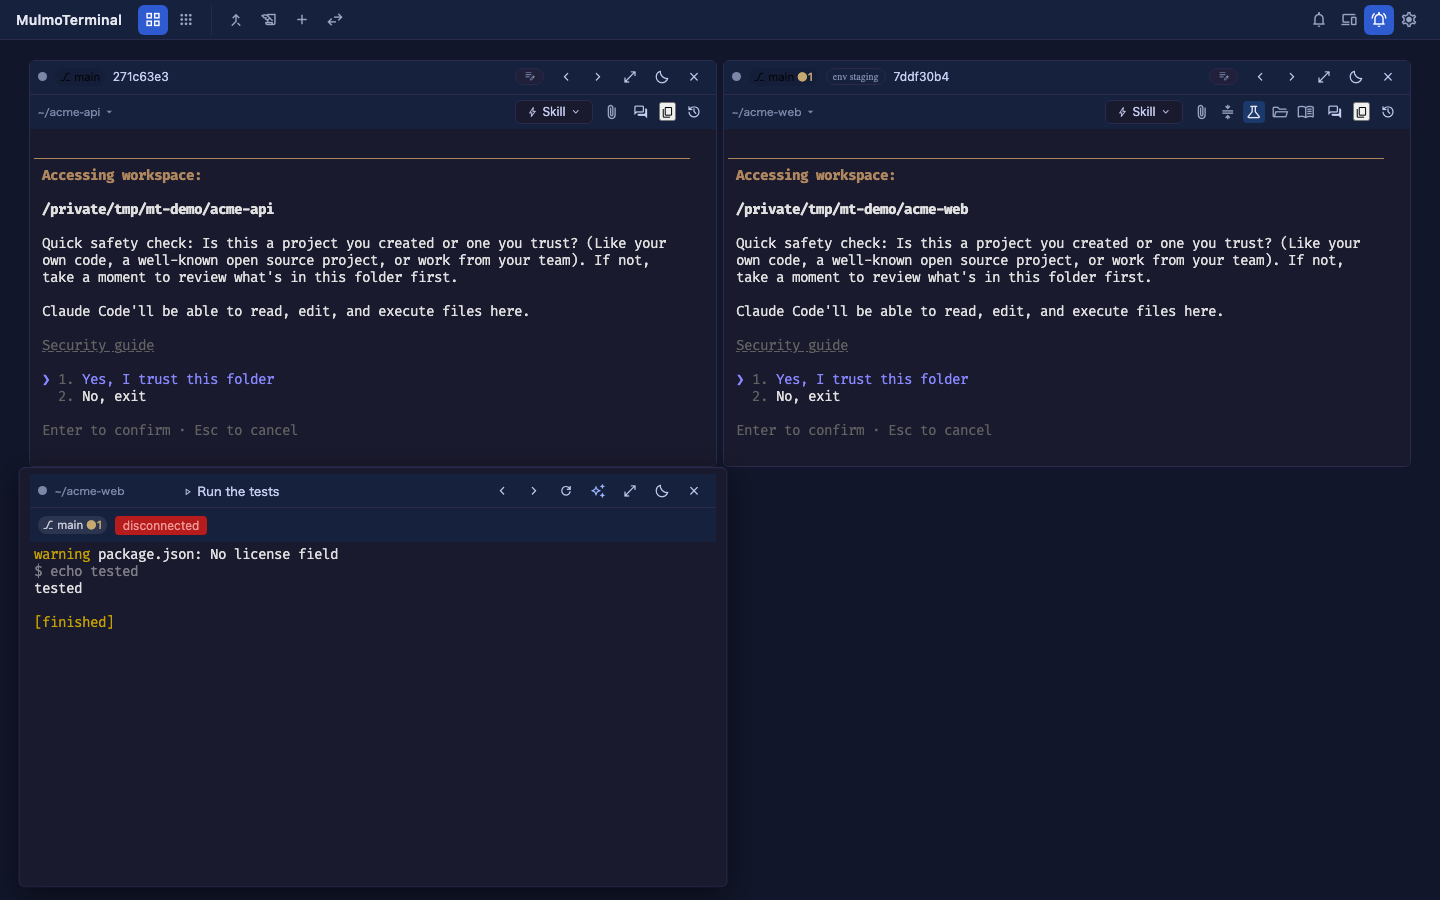
cmdnever reaches the browser. On click the server looks it up again byid, shell-escapes the${variables}, and runs that.
run: "open" — open something
One key inside open decides what opens.
The table is also the precedence if you write more than one — highest first.
| Key | Opens |
|---|---|
pr | the current branch’s PR in the browser (the button hides itself when there is no PR). The server resolves it into url, so it beats an explicit url written alongside it |
url | a URL in the browser (http / https only) |
reveal | the OS file manager (Finder / Explorer / xdg-open) |
files | the in-app file explorer |
view | an in-app view: prs / wiki / collections / accounting. (diff is accepted but has no dedicated screen yet and opens the files view — reach a worktree’s diff from the diff badge instead) |
terminal | a new terminal cell in that directory |
pickFile | the OS file dialog, inserting the chosen path into the prompt |
{ "id": "handbook", "icon": "menu_book", "label": "Open the team handbook", "run": "open", "open": { "url": "https://example.com/handbook" } }
Write only one per button. Set several and only the first in that order takes effect; the rest are silently ignored.
5. ${variables} and when
${variables}
Available in text, cmd, the open values, and a custom chip’s text:
dir dirName branch repo remoteUrl ahead behind dirty agent model task session
{ "id": "files", "icon": "folder_open", "label": "Browse this project's files", "run": "open", "open": { "files": "${dir}" } }
when — show it only sometimes
A button whose condition fails is not drawn at all (better than a row of buttons that do nothing).
| Form | Meaning |
|---|---|
isGitRepo | in a git repository |
agent == claude | this cell is Claude (also codex / antigravity) |
repo == owner/name | in that repository |
Combine with && and || (&& binds tighter).
{ "id": "compact", "icon": "compress", "label": "Compact this conversation", "run": "input", "text": "/compact", "when": "agent == claude" }
whenis a visibility filter, not a security boundary. What authorizes arun: "shell"button is that the command is written in your own config file.
6. Ordering, and how the two files combine
order(a number) sorts them. Buttons without one go last, and equal values keep the order you wrote.- Global and project buttons merge by
id. Sameid→ the project wins; newid→ it’s added. So common buttons can live in the global config and only the project-specific ones in.mulmoterminal.json. - The built-in default set, though, is replaced as soon as either file writes
buttons(→ the trap). chipsdo not merge. If the project has them, the project’s list wins outright.- The caps are 32
buttonsand 16chips.
7. Chips — putting information in the header
chips reorders and hides the info display on row 1, and adds your own. Omit it and the default set stays.
{ "chips": ["git", "ctx", { "label": "Which environment this project deploys to", "text": "env staging" }] }
Only five of them actually respond
| id | Shows | |
|---|---|---|
git | branch and unsaved count (⎇ main ●1) | ✅ you control it |
work | the PR / issue this cell is on (#977 → #966) | ✅ |
diff | the worktree diff badge (+2 ●5) | ✅ worktree cells with changes only |
ctx | model and context usage | ✅ once the agent reports it |
usage | rate-limit consumption | ✅ same |
dir / status / tools | project badge / status dot / tool timeline | ❌ structural — listing them does nothing, omitting them hides nothing |
Writing dir / status / tools is not an error; it is silently ignored.
Custom chips
{ "label": …, "text": …, "when": … } adds a read-only piece of text.
What’s displayed is text; label is again the tooltip — same rule as buttons. ${variables} expand inside text.
The env staging on the right-hand cell of the screenshot above is exactly this.
Once you write
chips, list everything you want. The list you write becomes the whole set, so droppingworkalso drops the PR / issue display.
8. Filtering the Skill menu
The header’s ⚡ Skill lists the skills available in that directory (the project’s .claude/skills first, then ~/.claude/skills; alphabetical within each group, and a project skill shadows a user one of the same slug). Picking one runs it in the current session (/<slug> for Claude, Use the "<slug>" skill. for Codex).
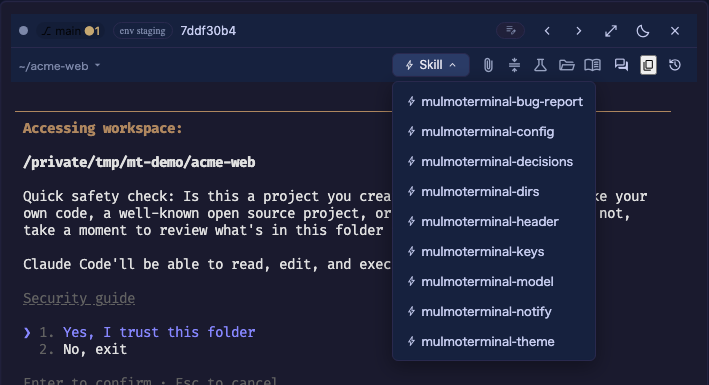
When the list grows unwieldy, skills in the project’s .mulmoterminal.json turns it into an allow-list showing only those slugs, in that order.
{ "skills": ["review-diff", "commit-msg"] }
- Omit it and everything shows.
- A slug that matches nothing is ignored.
- This is a per-project setting. It cannot be written in the global
config.json.
See also
- Configuration → customizing the header — the full field reference
- Configuration → per-project settings — colours, names, ordering: the other keys in the same file
- Configuration → “Frequent commands in the Run menu” — adding a Run menu with
script.json - The
/mulmoterminal-headerskill — if you’d rather have it written for you