Getting started — from zero to running
This page takes you from nothing installed to a running MulmoTerminal. No prior command-line experience assumed — work down the page and you will get there.
Contents
- Start it right now
- The words on this page
- Step 0 — open a terminal
- Step 1 — install Node.js
- Step 2 — install Claude Code and log in
- Step 3 — install git and gh
- Step 4 — start it
- First things to do
- Check your machine —
init - When it doesn’t work
- Once you’re running
- The CLIs it drives
- What to read next
Start it right now
If you already have Node.js 22.9+ and the claude command, this is the whole thing:
npx mulmoterminal@latest
A browser opens on http://localhost:34567. To stop it, press Ctrl + C in the terminal you ran it from.
- It worked → First things to do
- It printed something and stopped → When it doesn’t work
- You don’t know whether you have those two → keep reading
There is nothing to install.
npxdownloads and runs in one step, so MulmoTerminal itself never gets installed on your machine. If you don’t like it, close it and you’re done.
The words on this page
| Name | What it is | Why you need it |
|---|---|---|
| Terminal | The window where you type commands — “Terminal” on macOS, “PowerShell” on Windows | Everything below starts by pasting one line into it |
| Node.js | The runtime that JavaScript programs run on. It brings the npm and npx commands with it | MulmoTerminal itself runs on it |
| Claude Code | Anthropic’s AI coding agent — the claude command | This is what MulmoTerminal runs in every cell |
| git | The tool that tracks changes to files | Worktree isolation, per-cell branch, diffs and commits |
GitHub / gh | Where git projects live online, and its official command | The PRs & Issues view and one-click PR creation |
MulmoTerminal is not an AI. It is a cockpit that runs many copies of your claude and shows you which one is waiting on you.
What to install, in order, and what you lose without each:
| Without it | Step | |
|---|---|---|
| Node.js 22.9+ | It won’t start | Step 1 |
| Claude Code | It won’t start — this is the one thing checked at launch | Step 2 |
| git / gh | It starts. You lose worktrees, diffs and the PR features | Step 3 |
| tmux | It starts. Sessions don’t survive a server restart | Step 3 |
Step 0 — open a terminal
macOS — press Command + Space, type Terminal, press Enter.
Windows — press the Start button, type PowerShell, press Enter. (Windows Terminal from the Microsoft Store works too.)
From here on, anything in a code box is meant to be pasted into that window, then Enter. If terminals are new to you, Claude Code’s own terminal guide walks through the basics.
Wary of pasting commands into a black window? Good instinct — keep it. Every command here comes from the official site for that tool, and each step links to it. Compare before you paste.
Step 1 — install Node.js
What for: MulmoTerminal runs on it, and it brings the npx command. Version needed: 22.9 or newer — the official LTS build is well past that.
Check first
node -v
If that prints v22.9.0 or higher, skip this step. If it says command not found or shows a lower number, carry on.
macOS
Open nodejs.org/en/download, take the LTS macOS Installer (.pkg), and run it. Click through the prompts.
With Homebrew, brew install node does the same thing (brew.sh).
Windows
Open nodejs.org/en/download, take the LTS Windows Installer (.msi), and run it.
Or from PowerShell:
winget install -e --id OpenJS.NodeJS.LTS
Close the terminal and open a new one afterwards. A terminal that was already open won’t see the new
node— this bites people on Windows in particular.
Confirm
node -v
npm -v
Two version numbers means you’re done.
Step 2 — install Claude Code and log in
What for: this is the agent that runs inside every cell. It is the only thing MulmoTerminal refuses to start without.
This one costs money. Claude Code needs a Pro, Max, Team or Enterprise plan, or a Console (API) account. The free Claude.ai plan does not include Claude Code. MulmoTerminal itself is free (MIT) and charges you nothing. → how token cost works
Install
The install Anthropic recommends is the native one — it doesn’t depend on Node.js.
macOS
curl -fsSL https://claude.ai/install.sh | bash
Windows (PowerShell)
irm https://claude.ai/install.ps1 | iex
Package managers install the same binary:
| Where | Command |
|---|---|
| Homebrew (macOS) | brew install --cask claude-code |
| winget (Windows) | winget install Anthropic.ClaudeCode |
| npm (any OS) | npm install -g @anthropic-ai/claude-code |
→ Official instructions: Claude Code setup
Log in
claude
A browser opens — follow the prompts. Type /exit when you want to leave the session.
Confirm
claude --version
A version number means you’re done. If it errors, claude doctor will say why (→ quickstart).
Step 3 — install git and gh
Skip this if you’re in a hurry — MulmoTerminal starts without them, you just lose those features. But these two are what make the actual point of the app possible: several agents on one repository without stepping on each other.
| Command | What it unlocks |
|---|---|
git | worktree isolation, each cell’s branch / unsaved-dot / diff panel, the PR footer |
gh | the cross-repo PRs & Issues view and one-click PR creation from a cell |
tmux (recommended) | session persistence — terminals survive a server restart |
git
- macOS — run
xcode-select --install(orbrew install git) - Windows — installer at git-scm.com/downloads/win
git --version
gh (GitHub CLI)
gh is GitHub’s official command, so it needs a GitHub account — create one at github.com if you don’t have one.
- macOS —
brew install gh - Windows —
winget install -e --id GitHub.cli - Anywhere — cli.github.com
Then log in:
gh auth login
gh auth status
MulmoTerminal uses that gh login as-is — no access token is stored anywhere by it.
tmux (recommended)
- macOS —
brew install tmux - Linux —
sudo apt install tmux - Windows — no native build. Everything still works; sessions just don’t survive a server restart.
Step 4 — start it
npx mulmoterminal@latest
- The first run spends a few tens of seconds downloading
- It prints
✓ MulmoTerminal is readyand opens your browser - If nothing opens, go to
http://localhost:34567yourself - Stop it with Ctrl + C — closing the browser tab does not stop the server
Options worth knowing:
| To do this | Add |
|---|---|
| Use a different port | --port 8080 |
| Open in a specific folder | --cwd ./my-project |
| Don’t open the browser | --no-open |
| See everything | --help |
First things to do
What you’re looking at is the grid. One cell is one agent. Empty cells show the launcher form.
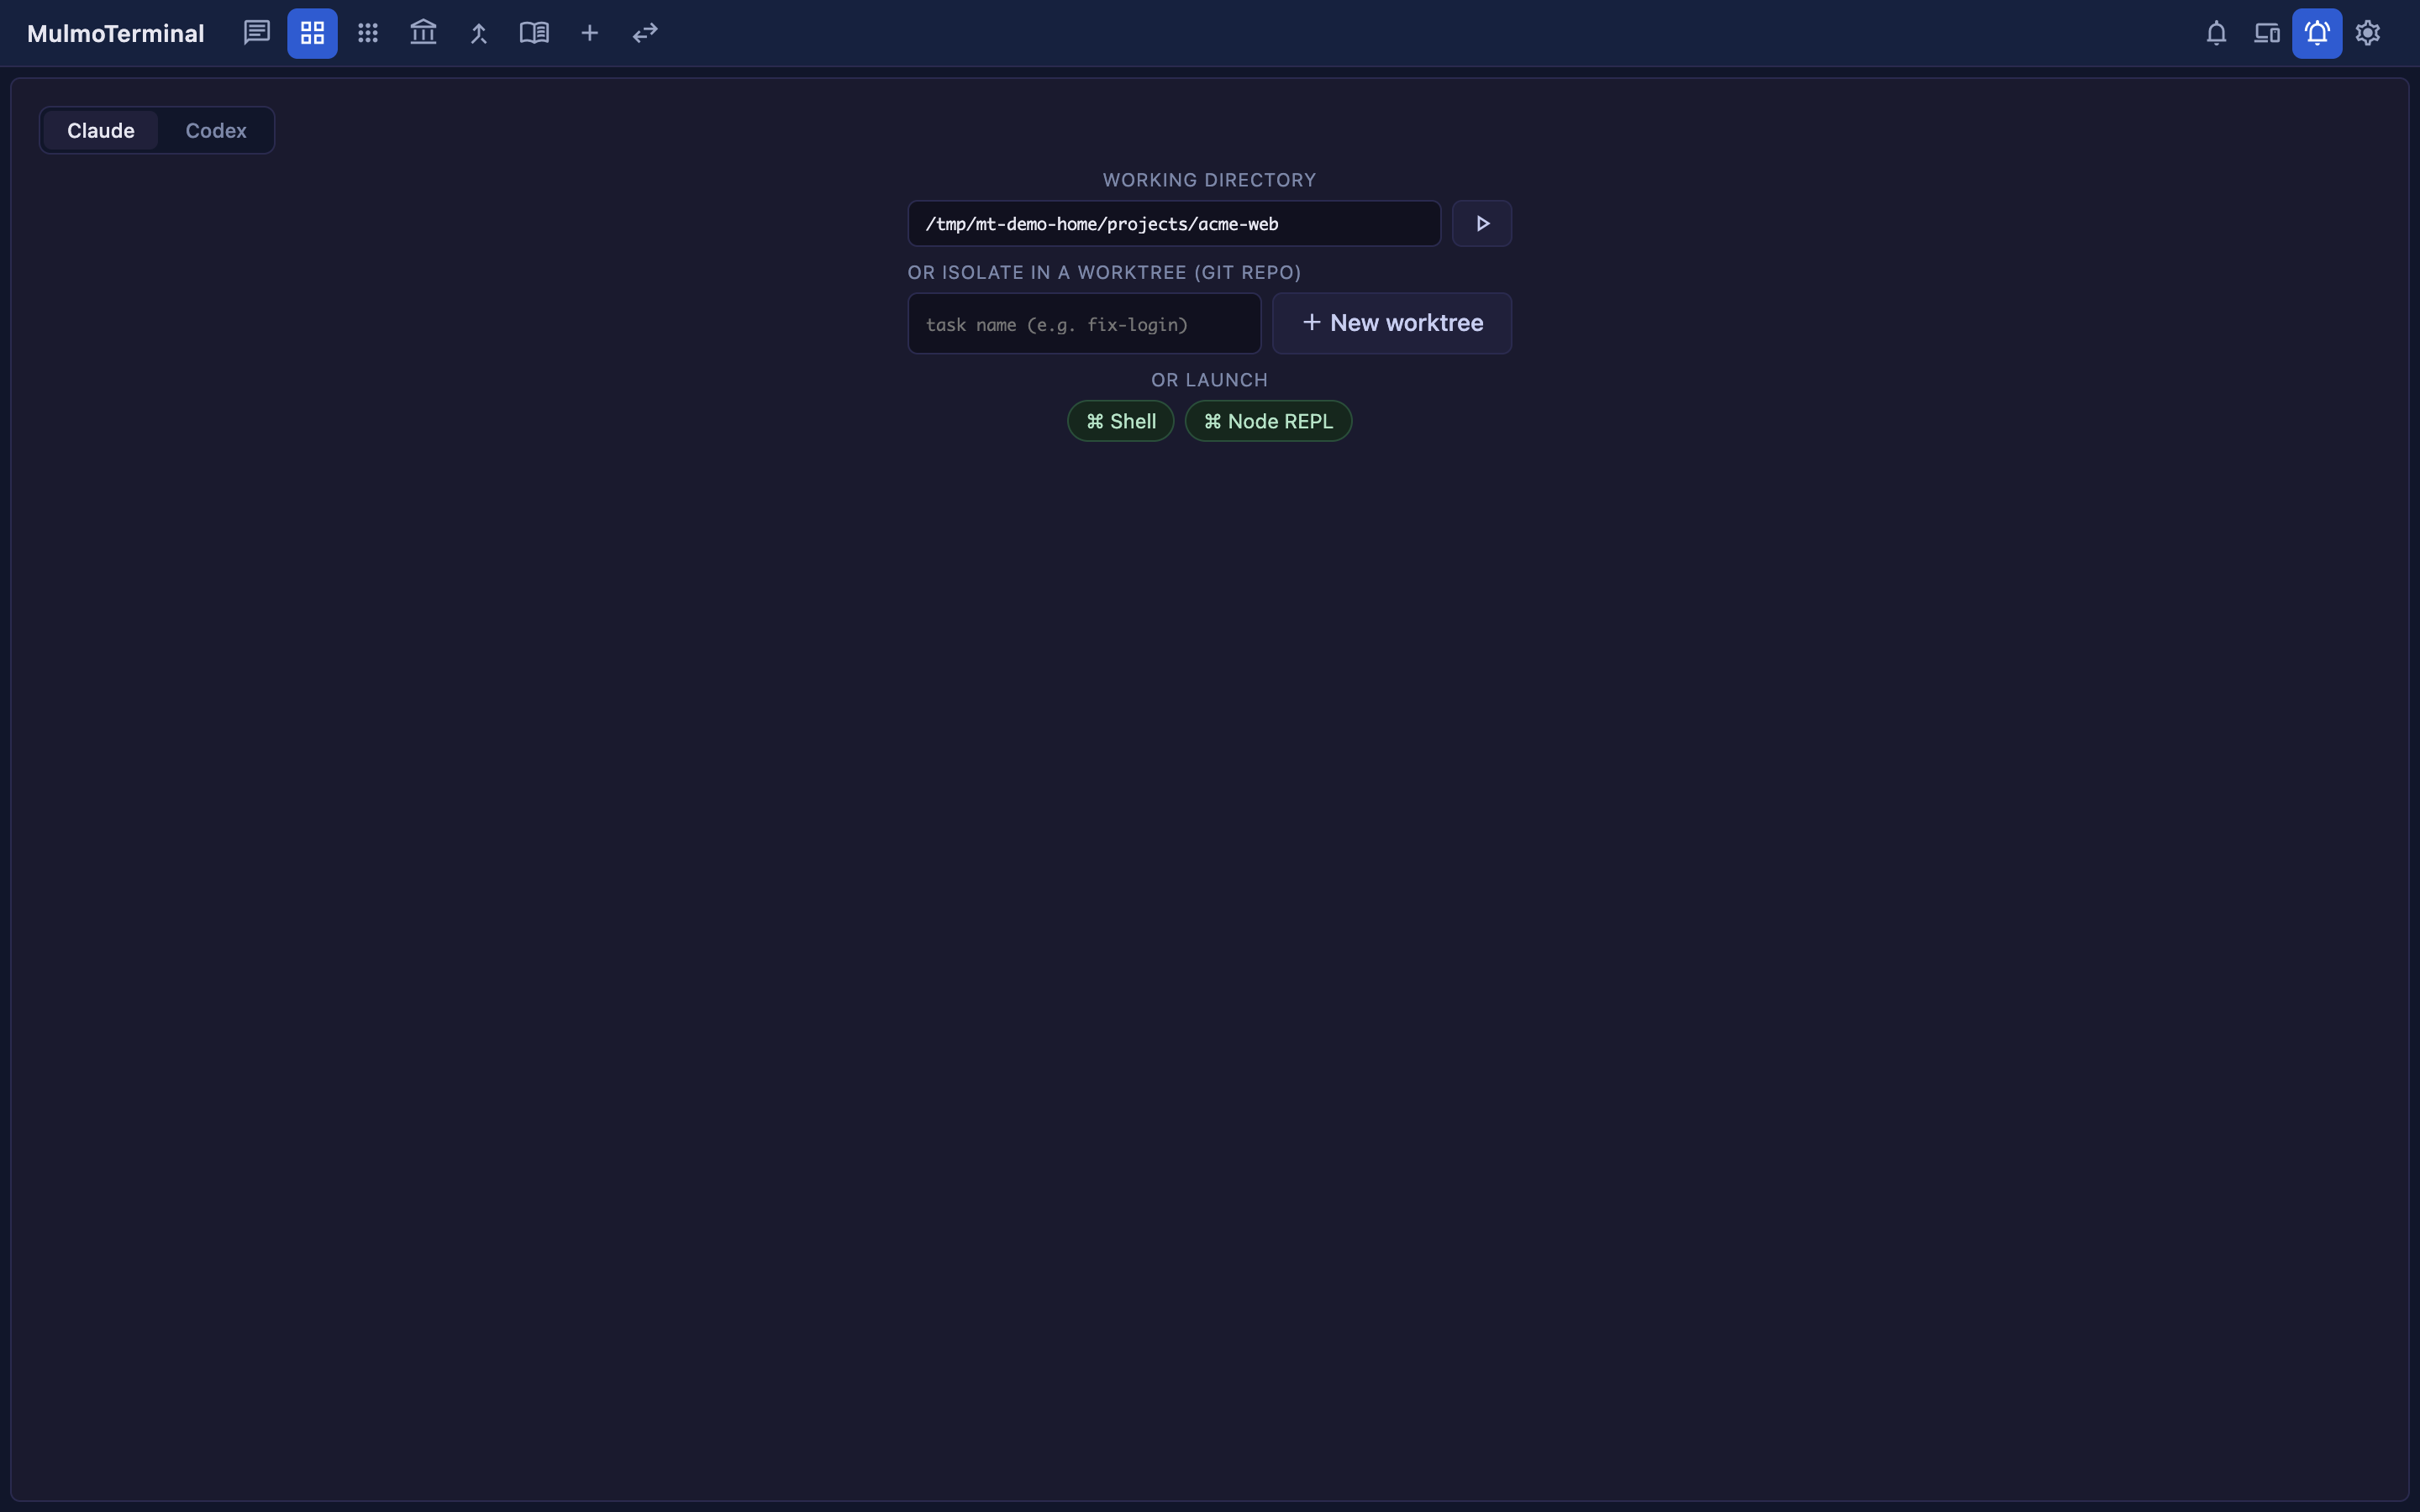
- Pick Claude
- Type the folder you want to work in under WORKING DIRECTORY
- Press the play button
That’s your first agent. Do the same in the next cell for a second one. The cell’s colour tells you where it is: working = blue, waiting for your input = amber, finished = green ring.
If you already use Claude Code: this is the same mechanism as claude --resume, reading the transcripts already on your disk. Point it at a directory you work in and your history is there. Nothing to migrate, nothing to re-explain.
→ How to read the screen: Basics. How people actually run it: Scenarios.
Check your machine — init
One command reports what is missing. It is idempotent — run it as often as you like.
npx mulmoterminal@latest init
- Reports your Node version and
claude/git/gh/glab/tmux/codex/ffmpeg/ollamaas✓(found),✗(required, missing),○(optional) - Seeds the launcher’s directory presets from your Claude Code history
- Writes
~/.mulmoterminal/config.json, keeping your other settings - With
claudeinstalled, offers to hand off to the/mulmoterminal-configskill
It is also the fastest way to find out why a start failed.
When it doesn’t work
| What you see | Cause and fix |
|---|---|
command not found: node / npx | Node.js isn’t installed, or the terminal predates the install → Step 1 |
Claude Code CLI not found. | claude is missing or not on your PATH → Step 2. Check with claude --version |
ERR_MODULE_NOT_FOUND | A corrupted npx cache, not a bug in the package. An interrupted first npx install leaves a half-unpacked entry behind. The launcher prints the exact removal command — run it, then npx mulmoterminal@latest again |
Port 34567 is already in use. | It is probably already running — try http://localhost:34567 first. To really run a second one, --port <number> |
It asks MulmoTerminal is already running | Two at once is not supported — they share ~/.mulmoterminal and can overwrite each other’s session state. Answer N and use the one that’s running |
| The browser never opens | Open http://localhost:34567 by hand; it’s the same thing |
| The UI loads but a cell won’t start | Check the directory exists, and that Step 2’s login went through |
| Windows says there’s no tmux | Expected. It runs without persistence |
If none of that explains it, type /mulmoterminal-bug-report in any session. The bundled skill hears the symptom out, checks your real config and version to see whether it is configuration or by design, searches the existing issues, and only helps you file one if none of that explains it — environment collected, secrets masked.
Once you’re running
Everything below is for after the first launch.
Typing npx every time
A global install gives you a plain mulmoterminal command:
npm install -g mulmoterminal
mulmoterminal
It does not auto-update — you get a notice at startup when a new version ships, and npm install -g mulmoterminal@latest applies it. npx mulmoterminal@latest always fetches the newest instead. Set MULMOTERMINAL_NO_UPDATE_CHECK=1 to silence the notice.
Where settings live
| Path | What’s in it |
|---|---|
~/.mulmoterminal/config.json | Global settings — directory presets, header, theme, notifications, models |
.mulmoterminal.json in a project | That project only — colour, name, ordering |
Your existing ~/.claude/ setup (hooks, MCP servers, CLAUDE.md, permissions) is not touched. What runs is your own claude, so all of it keeps working.
Change settings from Settings in the UI, or type /mulmoterminal-config in a session and have it written for you. → Configuration
Reaching it from another machine or your phone
The server listens on loopback (127.0.0.1) only by default, so a malicious page you happen to open can’t drive your local Claude. To reach it from elsewhere, an SSH port forward is the recommended route.
If you only want to watch and reply from a phone, there is a dedicated path for that. → From your phone / Mobile notifications
The CLIs it drives
MulmoTerminal is a cockpit over the tools you already develop with, so what you have on your PATH decides how much of it lights up. claude, git and gh carry the core grid; each remaining row unlocks one feature.
“Required” here means losing it costs whole views rather than one button. The only thing that stops the server from starting is a missing claude — it comes up without git and gh, you just lose worktrees, diffs and the entire PR surface. A recommended or optional row costs you that one feature.
| Tool | What it gives you | Install | |
|---|---|---|---|
| Required | claude | every Claude session | Step 2 |
| Required | git | worktree isolation, each cell’s branch / unsaved-dot / diff readout, the PR footer | Step 3 |
| Required | gh | the cross-repo PRs & Issues view and one-click PR creation | Step 3 |
| Optional | glab | the same for gitlab.com projects — list, start work on an issue, open a merge request | brew install glab, then glab auth login |
| Recommended | tmux | session persistence — terminals survive a server restart | brew install tmux · sudo apt install tmux · no native Windows build (plain terminals instead) |
| Optional | codex | Codex sessions in a cell, alongside Claude | npm i -g @openai/codex |
| Optional | ffmpeg | video rendering from the GUI panel’s mulmo-script plugin | brew install ffmpeg · sudo apt install ffmpeg |
| Optional | ollama | claude-ollama — Claude Code against a fully local model | ollama.com/download |
init reports which of these it can find on this machine.
A Shell cell needs none of them — pick Shell in an empty cell and give it a directory. For a different model, see Using another model via OpenRouter.
What to read next
- Basics — what you can do in the grid (how to read the screen)
- FAQ (existing sessions, Windows, token cost, how it compares)
- Scenarios — workflows by example
- Configuration
- Glossary
日本語版は はじめに — 起動するまで にあります。